Start a Audio File Over Again in Audacity


In this article I'm going to show you how to turn ambient sounds, like engine recordings, background noise or environment audio clips, into seamlessly looping sound effects that you can use in your game.
What's more, I'll be doing it in Audacity which, apart from being pretty darn good, is completely free.
So… How do you make a loop in Audacity?
- Use the select tool to highlight the audio you want to loop
- Use trim outside selection to remove any excess audio that you don't want
- Use the cut tool to detach a section from the start of the loop
- Move it to a new channel and move the section to a point slightly past the end of the audio clip (so that it overlaps)
- Select the overlapping region across both channels and select create crossfade
- Apply a very short fade in at the start and fade out at the end of the clip to prevent a pop when the file first starts
In this article, I explain exactly how to perform each of these actions in detail and show you how to make a seamless ambient loop in Audacity, step by step.
How to make looping sound effects with Audacity
To demonstrate how to make a loop from a longer audio clip, I'm going to create a looping wind sound effect from a simple recording of me blowing into my microphone (with a pop shield).
Here's what the original recording sounds like:
I'm going to show you how to cut out a section of the recording and use it to create a short, seamless loop.
Here's how to do it…
- Download and open Audacity, if you haven't already.
- Drag and drop your source audio into the project window. You'll be asked if you want to make a copy of the file, you can choose either option but it's usually better to select 'Make a Copy'.
- Select the section of audio that you'd like to loop using the Select tool
 .
.
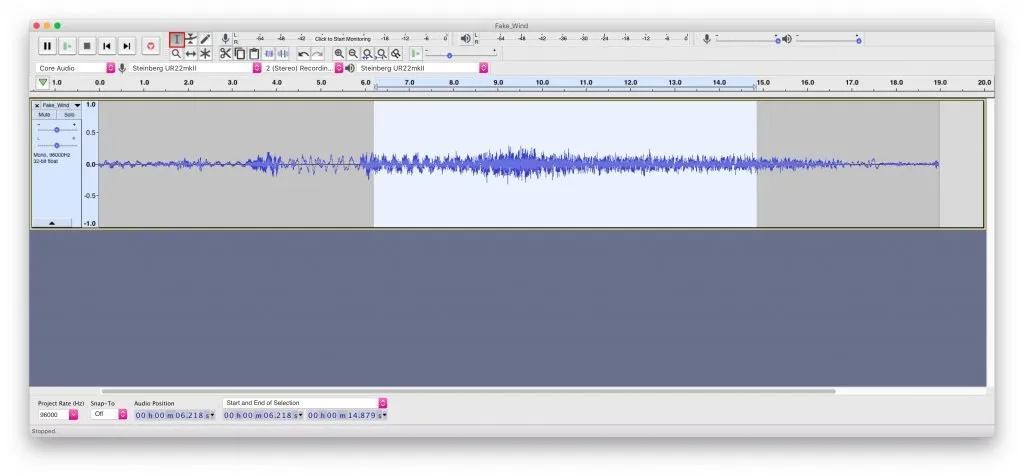
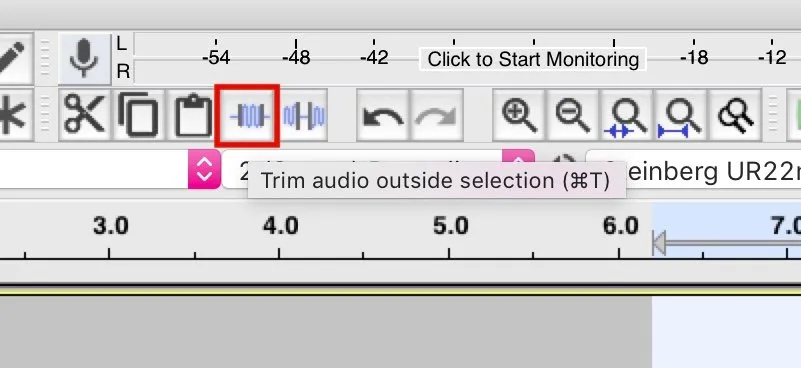
- UseTrim Outside Selection
 to remove audio either side of the selection.
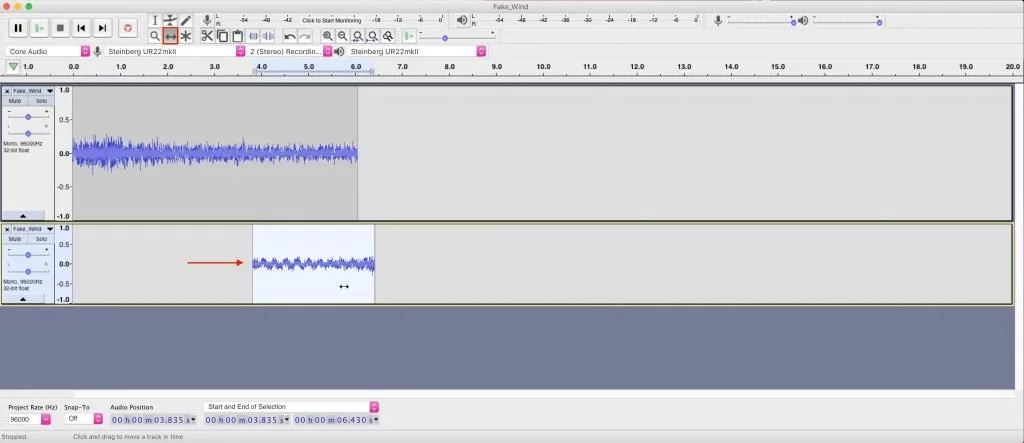
- Switch to the Time Shifttool
 and move the trimmed audio to the start of the track.
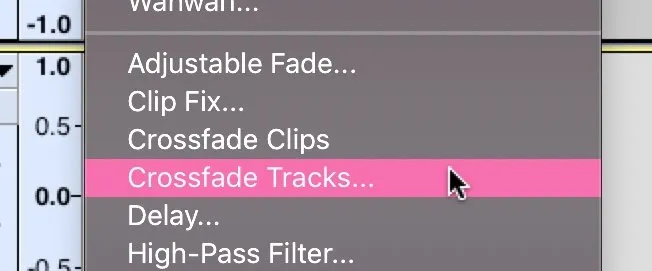
Creating a crossfade in Audacity
- Switch back to the Select tool and select a section from the start of the clip. How much of the clip you select will affect how long the crossfade is during the loop so make sure to select enough for a smooth fade (aim for at least a few seconds).

- Use the Cut tool
 to cut the selection, click off of the current track (in the space below) and use the Paste tool
  to paste the cut section on to a new track.
 - Using the Time Shift Tool , move the newly pasted section to the end so that it just overlaps the end of the original audio track.
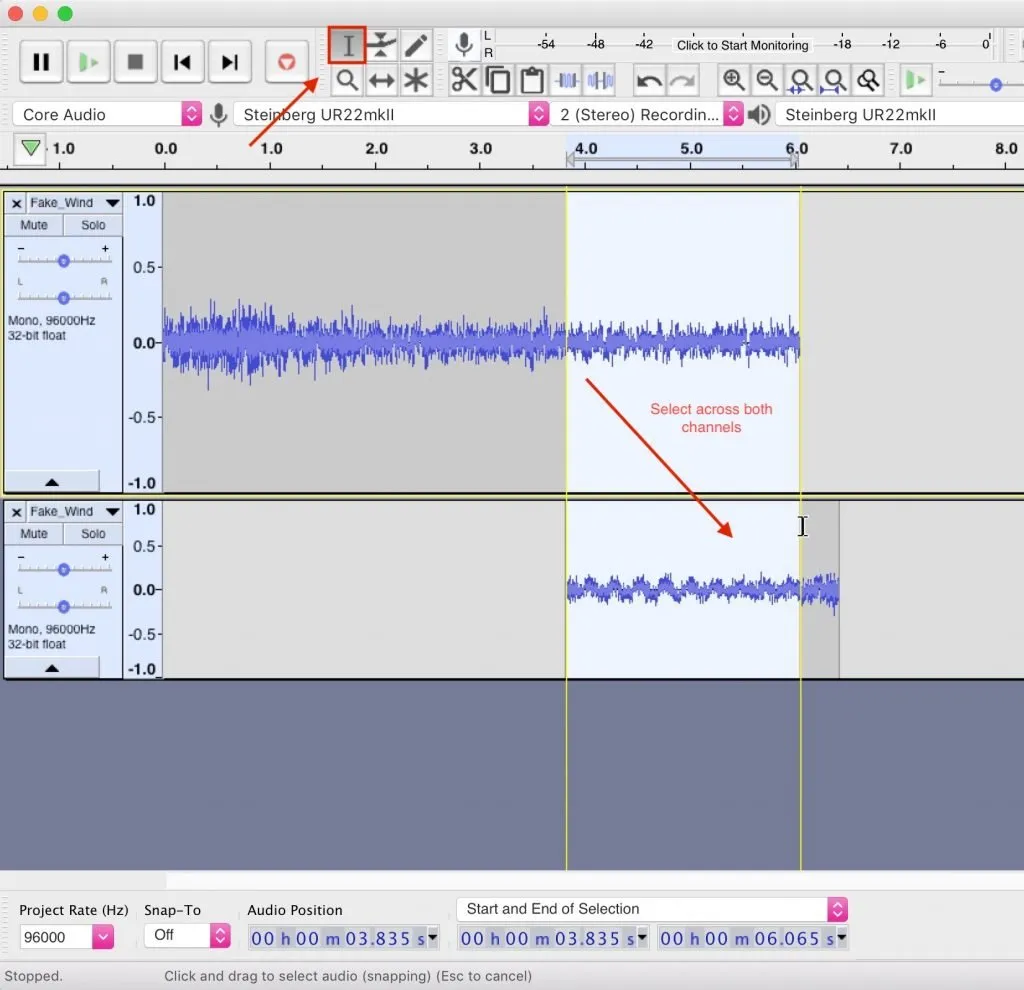
- Using the Select tool , click and drag to highlight a crossfade region across both audio tracks, using the yellow guide lines to snap to the end of the top clip and the start of the bottom clip.
- Select Effects > Crossfade Tracks from the menu.
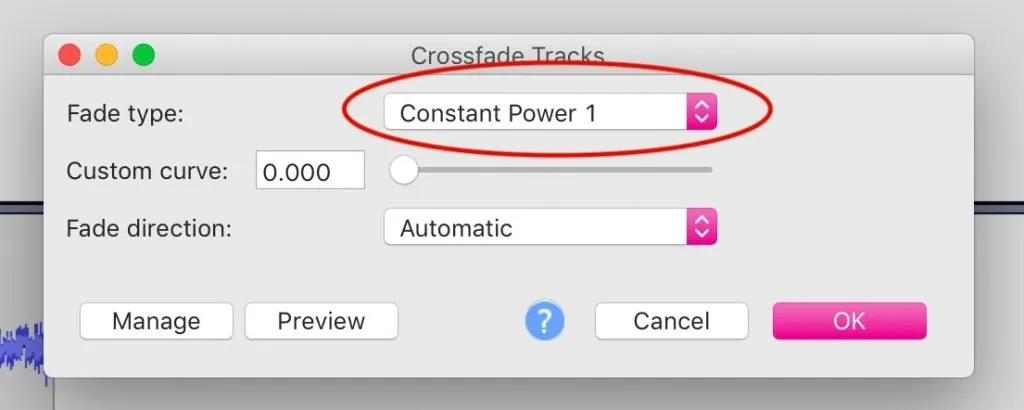
- For the Fade Type choose Constant Power 1 and hit OK. This prevents a dip in volume in the middle of the crossfade that you might get with a linear fade curve.
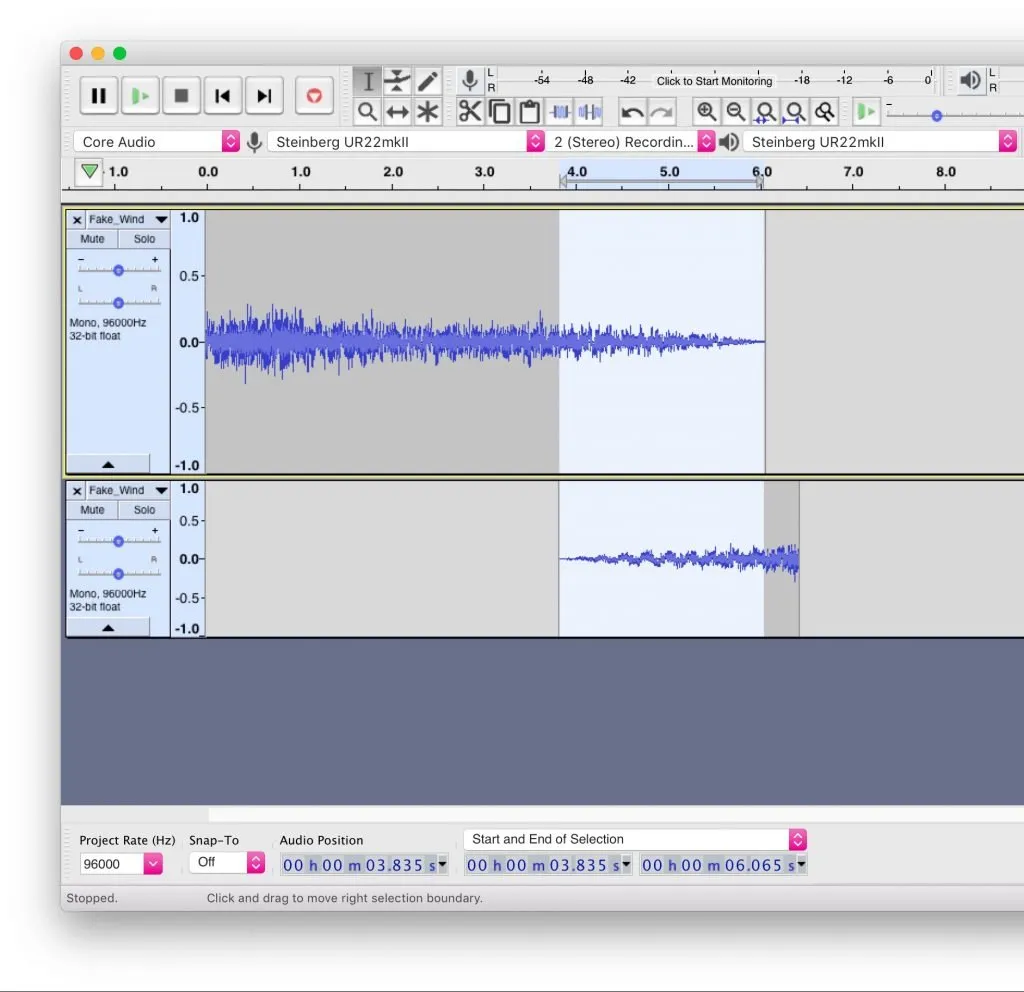
- Your audio tracks should now look something like this:
Creating the seamless loop
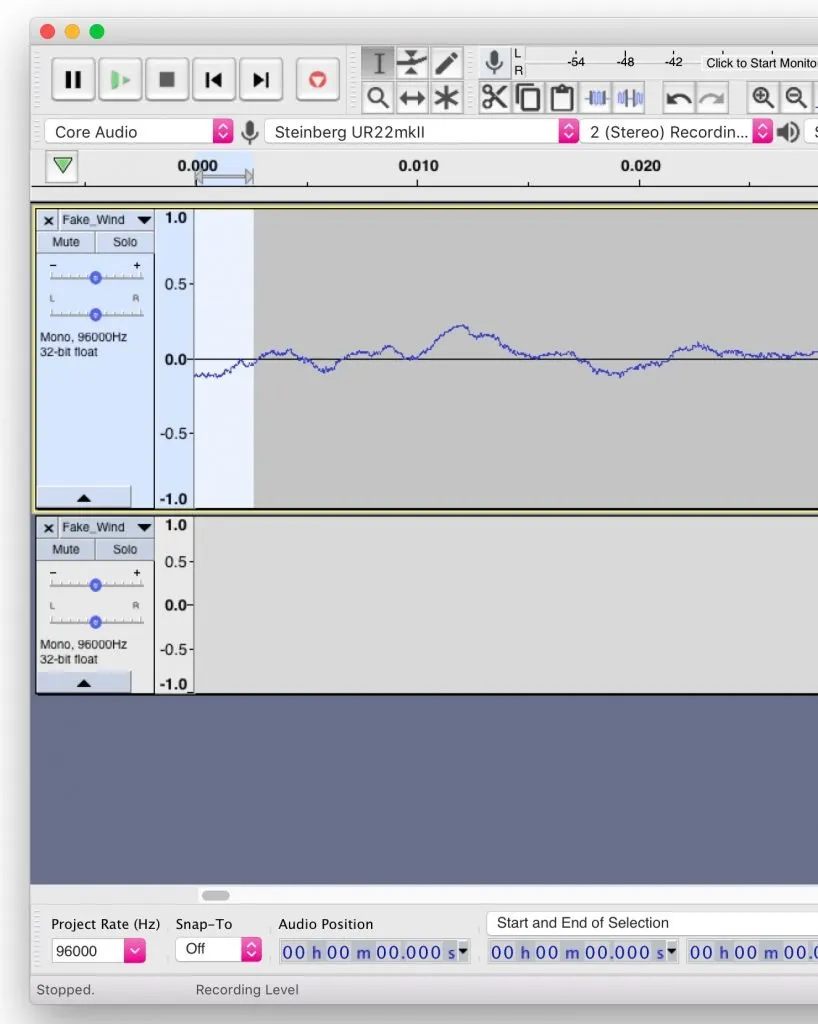
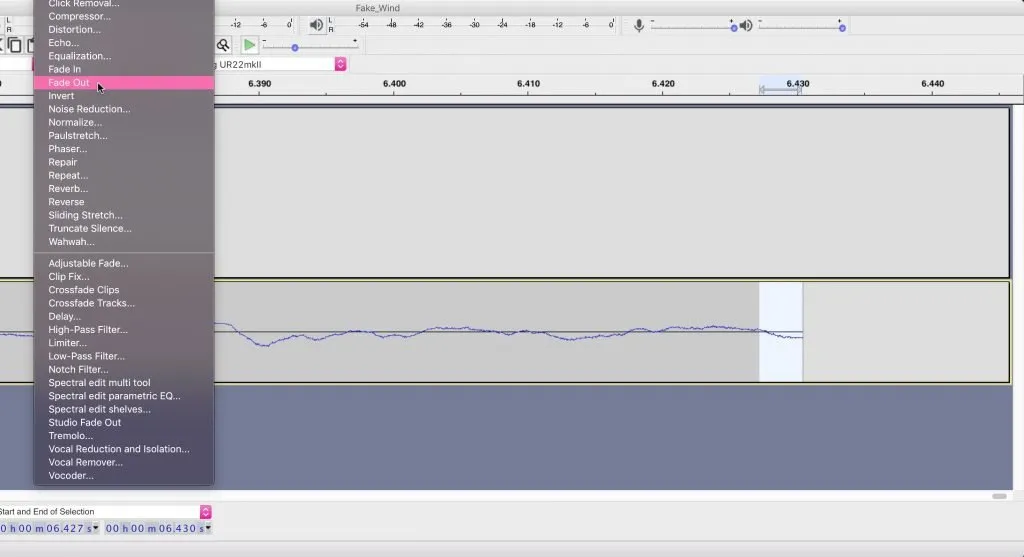
- You're almost done! Zoom in to the very beginning of the first audio clip, make sure you're at the start and that you're zoomed in so much that the audio wave becomes a single line, instead of a block of colour.
- Using the Select tool Select a, very, small section at the beginning of the audio wave. Select Effects > Fade In to apply a short fade in.
- Zoom to the very end of the second clip and do the same, this time selectingEffects > Fade Out.
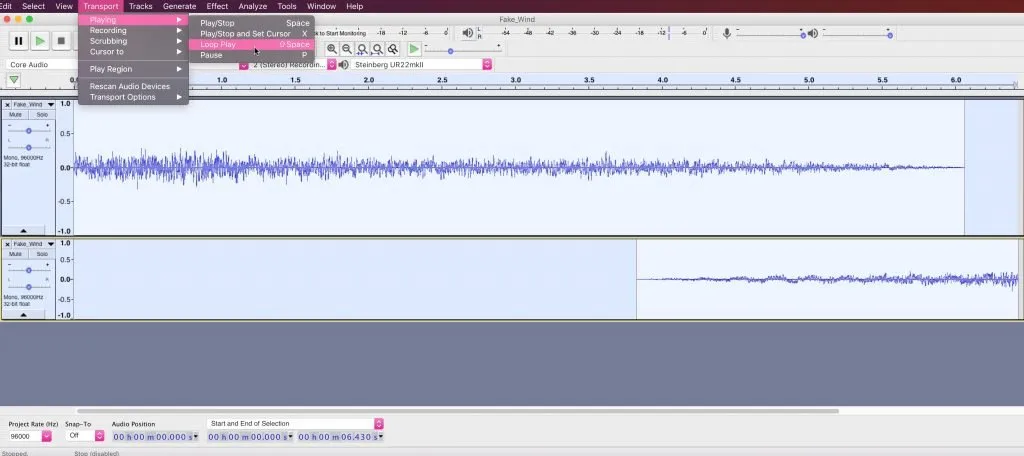
- Select both clips using Select > All or by pressing cmd+A / ctrl+A. Preview the loop by selecting Transport > Playing > Loop Play. If everything is sounding right, it's time to export.
Adding a short fade in and out prevents the audio file from popping when it first plays from silent. It works best when you try to match the natural curve of the audio wave. If you can hear a quick, smooth dip, like a bump at the loop point, then the fades are too long, if you can hear a noise that resembles a static pop, the fades are too short. You may need to listen with headphones to check this.
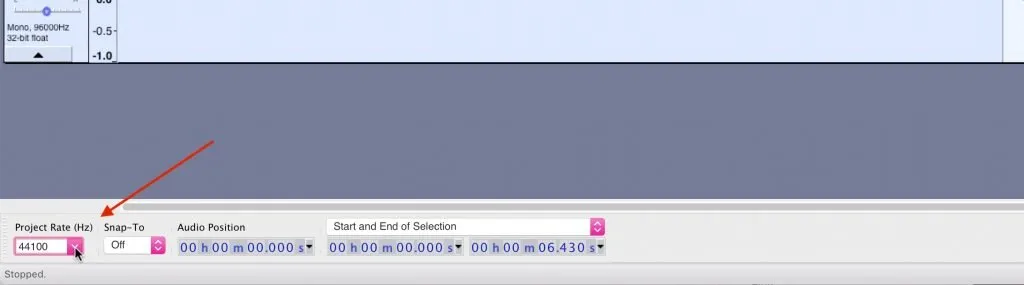
- Change the sample rate. If, like me, you've been using a high sample rate audio clip (my file was 96khz) then now would be a good time to choose a lower sample rate for export. Select Project Rate in the bottom left corner and choose a new sample rate. For game development, and many other uses such as CD quality music, 44100 (44.1khz) is more than adequate. 48000 (48khz) is also fine, but is more often used in video work.
- And you're done! SelectFile > Export and choose 16bit WAV to save the loop. Please note that many compressed formats, particularly MP3 do not loop properly so you're better off using uncompressed audio.
The End Result
Here's the final loop, repeating three times:
Now it's your turn
Audacity makes it easy to professionally edit and create looping sound effects without spending money on pro audio software that you probably don't need for basic tasks like this.
Now that you can edit your own looping sound effects, what will you make and what will you use it for? Let me know by leaving a comment before you go.
Image Attribution

My favourite time-saving Unity assets
Rewired (the best input management system)
Rewired is an input management asset that extends Unity's default input system, the Input Manager, adding much needed improvements and support for modern devices. Put simply, it's much more advanced than the default Input Manager and more reliable than Unity's new Input System. When I tested both systems, I found Rewired to be surprisingly easy to use and fully featured, so I can understand why everyone loves it.
DOTween Pro (should be built into Unity)
An asset so useful, it should already be built into Unity. Except it's not. DOTween Pro is an animation and timing tool that allows you to animate anything in Unity. You can move, fade, scale, rotate without writing Coroutines or Lerp functions.
Easy Save (there's no reason not to use it)
Easy Save makes managing game saves and file serialization extremely easy in Unity. So much so that, for the time it would take to build a save system, vs the cost of buying Easy Save, I don't recommend making your own save system since Easy Save already exists.
Source: https://gamedevbeginner.com/create-looping-sound-effects-for-games-for-free-with-audacity/
0 Response to "Start a Audio File Over Again in Audacity"
Post a Comment